Adding Instruments and other signal sources to MIR Pro 3D
You can route all kinds of audio sources to MIR Pro 3D – first of all Vienna Instruments, or Synchron Instruments using MIR-ready mixer presets, but also virtual instruments from 3rd-party manufacturers and plain audio channels. As already mentioned, a new channel simply has to be equipped MIR Pro 3D as an inline/insert effect. The plug-in routes the signal from your host to the MIR Venue, where it is represented by a MIR Icon, and after processing back to your host with both the positioned dry signal component and the individual room information created for this signal.
Using the Wet Signal Routing that’s part of the plug-in in Vienna Ensemble Pro, the Wet part of MIR Pro 3D’s output can be split from this channel for many different kinds of applications.
The MIR Icon
The MIR Icon on the stage of a MIR Venue is a specially developed tool to control the most relevant aspects of a signal source in a room and thus in a mix. Every time you change the Icon’s position, stereo width or direction on the stage, a new set of impulse responses is pre-rendered in the background, indicated by the activity gauge in the bottom right corner of MIR Pro 3D’s Main Window. These pre-rendered IRs are created temporarily (they won’t get saved to disk) and contain virtually all relevant features for MIR Pro 3D: They are unique regarding the signal source’s position, direction, width, Instrument Profile, and the chosen Output Format.
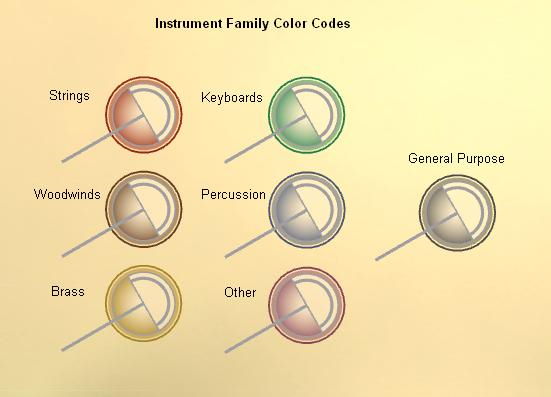
Color codes: These are the default colors supplied automatically on Instrument Profile selection. Colors can be changed freely by using the Change Color dialog from the context menu in the Mixer, the Channels List, or the Icon itself.
Channel List
The Channel List is on the left side of the Venue by default, but can be detached by dragging it to another position, or de-/attached by clicking on the window icon in its heading. It displays the Venues in use and the channels / Icons connected to them.
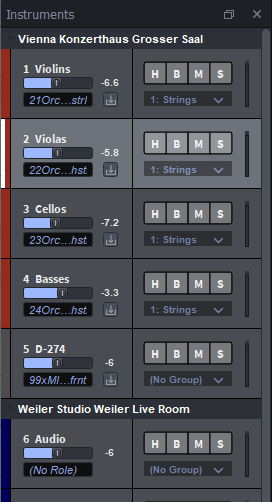
The vertical bar on the left side of a channel shows its color. If the channel is selected, a white stripe is added to the color bar, and the channel background becomes a bit brighter, and the detailed Instrument panel on the Venue’s right side switches to that channel.
The Role field under the channel name displays the (truncated) instrument’s Role assignment in the Venue. Click in the field to select another Role, or the down arrow next to it to re-assign the current Role to the channel.
Above the Role field you will find the volume control slider. Double-clicking on the value next to it allows you to enter the volume numerically, Ctrl/Cmd-clicking sets it to 0 dB.
The channels’ right side is dedicated to four on/off buttons and a Group field. Apart from plain clicking, you can Alt/Option-click these buttons to act on selected channels/Icons, and Ctrl/Cmd-click to affect the inverse selection, i.e., unselected channels.
- H is for “hide” – hides the channel or Group (according to Group settings) in the Venue view.
- B is for “bypass” – if active, MIR does not process the channel’s/Group’s audio, which goes to the next destination in the line.
- M is for “mute”.
- S is for “solo” – all other channels except the selected channel (or group according to your group settings) will be muted. In the Venue view, the solo’d instruments will blink to indicate their status.
Group settings
Using the group field under the four buttons, you can gather channels in different groups and define which types of behaviour they will share:
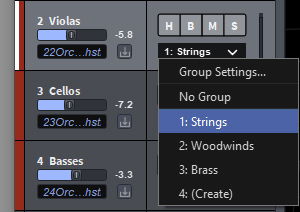
Clicking on Group Settings opens a panel showing the existing Groups, where you can check the features to be shared by each group’s members. Clicking (Create) sets up a new Group and opens the settings, where you also can create new Groups by clicking the “+” sign, or delete by clicking the dustbin icon. You may assign channels to Groups individually, or hold Alt/Option to assign all selected channels to the same Group.
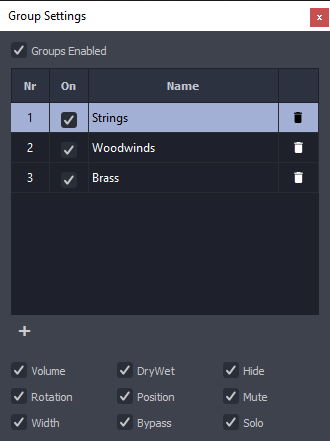
If you change one of the checked values of a Group Instrument, e.g., its volume, the volume of the other Instruments in that Group will change accordingly – values exceeding a range (such as volumes over +6 dB) will stay at their maximum or minimum and be “fetched” from there when the value re-enters the admissible range. This means that the relative value between Instruments is maintained as far as possible, but will of course shrink when one or more Instruments go over the parameter range. In the same vein, Position, Rotation and Width of grouped Icons will be kept in relation when changing them.
With Ctrl/Cmd + Shift + G you can disable/enable Groups if you need to work on individual Instruments without affecting others.
Channel options
Right-clicking on a channel opens its options panel, allowing you to adjust additional parameters. Channel definitions can be saved as .mirchan files, which you can import into other projects or assign to channels in another Venue.
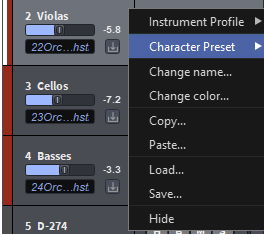
- Instrument Profile and Character Presets are shortcuts to parameters of the detailed instrument assignment settings, and will be covered in the next chapter.
- Change name can be done either here or by double-clicking directly on the channel’s name or in the header of the Instrument Panel on the right side of the Venue view.
- Change color opens a window where you can select one of the predefined channel colors, or mix together one of your own. Please note that depending on your Preferences settings, colors may change when you change the channel’s Instrument Profile within MIR, or its color in your DAW!
- Copy lets you copy the Instrument’s settings, and you can apply them to another Instrument with Paste. (“Paste” will only show up in the list if you’ve copied something before.)
- Use Load and Save to manage individual channel configurations between projects.
- Hide renders the channel/group invisible in the Venue view.
Note
You can copy/paste individually selected Icons on a MIR 3D Venue with Ctrl+Shift+C/V (Windows), Cmd+Shift+C/V (Mac)
Hide so you don’t have to seek
In some situations the visual appearance of your virtual orchestra might become a bit crowded – this is where the “Hide” function will help a lot. Hidden Icons will play just like visible ones – they only lack visibility. A typical example is the addition of a solo violin to a violin ensemble for increased musical expression. The solo violin will very likely sit “on top" of the ensemble, obscuring both Icons’ accessibility. Hiding the channel you’re not working on at the moment may improve your workflow. If you have assigned instruments to groups, or having “Auto-group selected channels” activated in your Preferences, you can also apply “Hide” and other functions to several channels at once.